
Slow Light (Light Painting)

A while back I was too cheap (lazy?) to get around to purchasing some speedlights and in typical DIY fashion for me, I figured I could replicate most results using nothing more than a flashlight. So one evening with my friend Sean and his wife, we decided to try out some long exposure light painting ideas.
To be clear, the term "light painting" is often used to describe painting light onto an image where the bulb is visible, and used to create something visual in the final result. This is NOT what I am referring to here. I've seen plenty that are nice, but I don't personally have much interest in doing this:
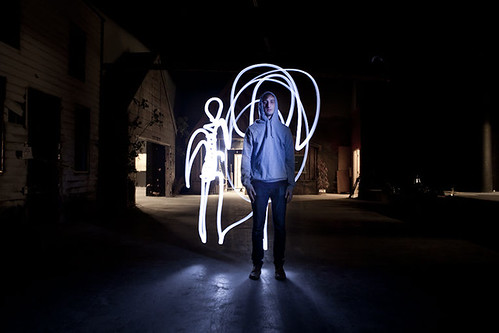
As far as I'm concerned, the definitive "light painting" of this type was done years ago by Picasso:

I absolutely love the quality of the light fall-off when using nothing more than a flashlight to illuminate a scene during a long exposure. The ability to move around and to selectively place light wherever you want it at whatever intensity you desire is surprisingly fun once you get started. So let's get started...
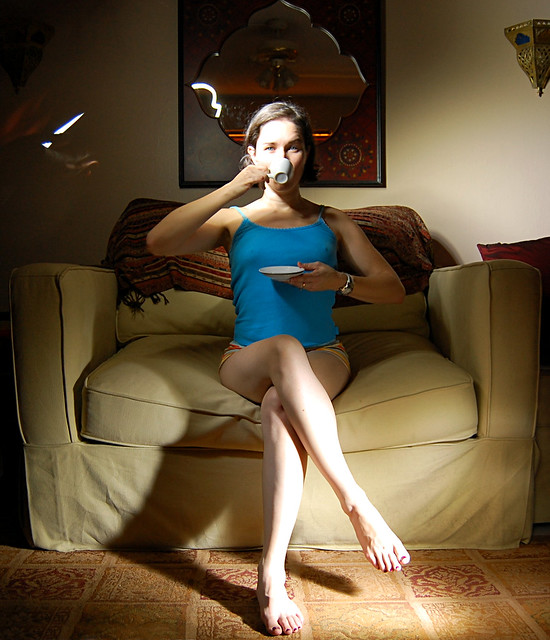
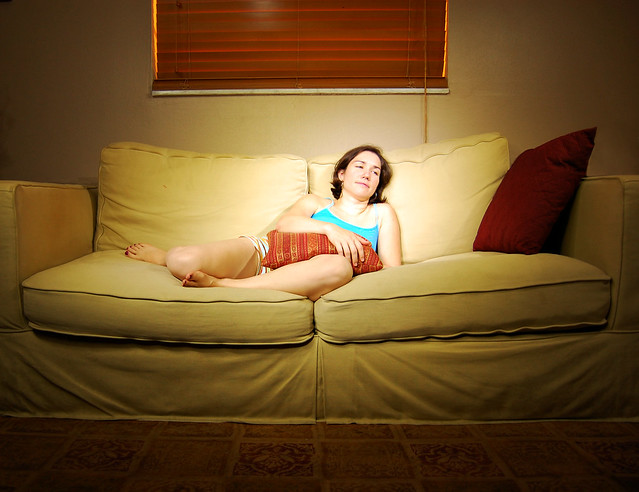
To illustrate what I mean, the lead image and the one above were shot with a 12 & 10 second exposure respectively. In the top one, I had a remote for the shutter (in my right hand) and Seans wife Monica used a small handheld LED flashlight to illuminate us. In the second image of Monica, I started the exposure and Sean used the same flashlight to throw light on different areas (you can even see small trails where the flashlight bulb was visible in the frame).
To be fair, it was a pain to hold those poses as still as we could, but the final result was worth it, I think.
There is no vignette applied post in the image above, that is all purely a function of the light falloff of the flashlight as I tried to illuminate Monica.
This technique is especially fun and useful for still life images and static objects. For instance, I could have broken out a light tent/box to illuminate my space marine hack job below, but it was easier just to set the camera on the table with an 8 second exposure, and to use a small LED book reading light that I waved around the miniature to "paint" the light onto it.

As to the technique, it's not very complicated. The trick is to think about the light you want over a several second long exposure vs. a faster exposure. With more time you can build the light up in intensity and layers to achieve your final result.
I will usually frame up my image with the lights on first, then kill all the ambient lights in the room, and begin the exposure. Having a remote, or setting the shutter to fire on a delay is very helpful to minimize vibrations that would cause ghosting issues. I usually use the 12 second delay on my camera (Olympus E-P1).
Then just begin "painting" the light onto your subject. If you get creative enough, you can recreate results that might not be very easy or possible using any other type of lighting.
It may take a few tries to get a feel for the exposure. I usually count off seconds in my head as I light a portion of the subject to give me a rough estimate to go by, and once I have a look at the results will adjust accordingly. You'll also probably want to start out by having the source light located in the same general area, then branch out to lighting from two or more directions.
A few random thoughts...
I personally try to get my exposures around a time that gives me ample time to light the subject the way I want to. Between 10 and 20 seconds is usually pretty normal for me, but I've moved up into the 30 second range on occasion. The only thing to watch out for is sensor noise (shooting a dark frame can alleviate this problem later in post).
If you're shooting a person, they really, really need to hold still.
Be aware of ambient light. This is actually harder than you think. At a 20 second exposure you might be quite surprised at the level of ambient light that can be picked up.
If you're looking to try a new photography technique one evening, this is a really fun one to try out that doesn't really require any other equipment (besides a camera and flashlight), and can really produce some neat results. I wholeheartedly encourage you to give it a try!
If you need some more inspiration, you can feel free to check out my Light Painting set on Flickr, or...
As a side note, I started a Flickr group a while back called Slow Light specifically for images lit with a handheld light. If you're on Flickr come on by and check us out.
As a parting gift, have a gander at one of Denis Savoie's incredible light painted images in the group.


Subscribe to:
Post Comments (Atom)
So many ideas, so little time! Soon...
ReplyDeleteSame feelings here. Just need to get off my lazy ass and do it!
Delete