
I’ve been wanting to get some ND filters to experiment with daytime long exposures for a while now. The problem is that I’m lazy. So when I say “for a while now”, I really mean that it’s been like 3 years.
The rest of my GIMP tutorials can be found here:
Getting Around in GIMP
Getting Around in GIMP
I had previously written about using median stacks to remove noise from an image, as an easy way to remove non-static objects from a scene, and to create interesting artwork. It’s those last two things that got me thinking...

All of the Playboy Centerfolds from 1970
This is one of the first amalgamation images I did after seeing Jason Salavon’s incredible work. This is all twelve centerfolds averaged together. While I think it’s neat, it’s more interesting when you begin to view it in the context of a typical long exposure image.
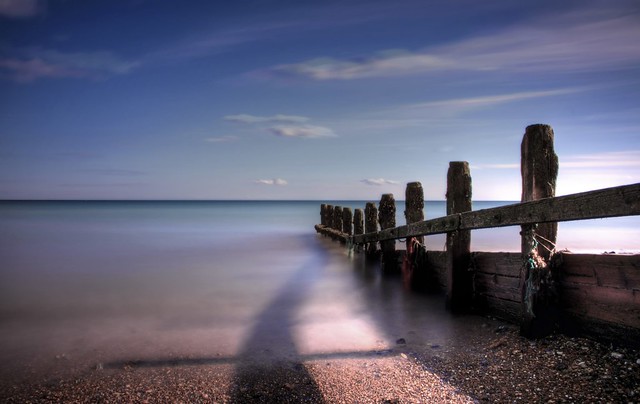
Do you see some visual similarities between the water in these long exposure images, and the centerfold image?
This similarity led me to realize the main point of this entire post:
Theoretically, there should be no difference between a single long exposure image, and multiple short(er) exposed images that have been averaged together.
It helps to visualize the fact that when taking a long exposure image, the camera is averaging over the duration of the exposure. I know this is probably “Duh!” for most people out there, but for me it was a “Eureka!” moment (it takes me a bit longer to get things).
If you want to skip the numbers and get straight to the results, click here.
Looking at the Exposure
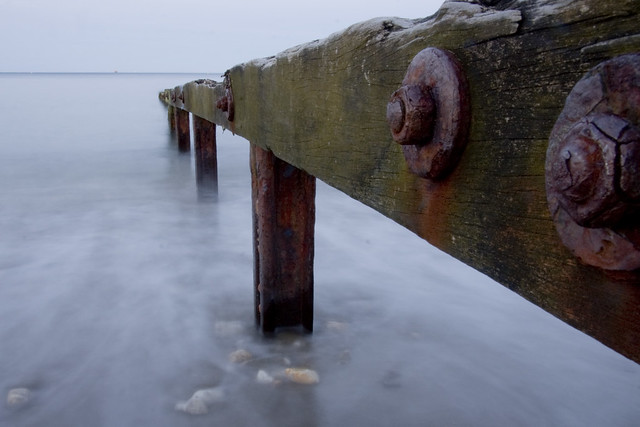
So let’s have a look at the numbers for the image, Long Exposure Groin , above. According to the photographer, Paul Chaloner, the image was exposed for 30 seconds, at f/22 ISO 200. For this discussion, I am going to assume that the ISO is already set to it’s lowest acceptable value.With that in mind, we can see the relationship of shutter speed and f-stop in this table:
| f Aperture | 0.7 | 1 | 1.4 | 2 | 2.8 | 4 | 5.6 | 8 | 11 | 16 | 22 | 32 |
| s Shutter | 1⁄30 | 1⁄15 | 1⁄8 | 1⁄4 | 1⁄2 | 1 | 2 | 4 | 8 | 15 | 30 |
This table shows the relationship of Aperture ( f ) to shutter speed (seconds) to maintain the same exposure (in full stop increments). The parameters for the base exposure are shown in green.
What this means is that if I wanted to have the same exposure, but wanted to change one of my parameters (either f-stop or shutter speed), I need only move left or right on the table to get the required values.
To illustrate, perhaps I wouldn’t want to shoot stopped all the way down to f/22. Instead I might prefer to shoot at f/11. No problem looking at the table for f/11 yields:
| f Aperture | 0.7 | 1 | 1.4 | 2 | 2.8 | 4 | 5.6 | 8 | 11 | 16 | 22 | 32 |
| s Shutter | 1⁄30 | 1⁄15 | 1⁄8 | 1⁄4 | 1⁄2 | 1 | 2 | 4 | 8 | 15 | 30 |
I can see that at f/11, my new shutter speed would be 8 seconds. Pretty elementary so far, and really just Exposure 101.
Things get a bit more interesting when we consider how some of these are shot. There is some more information about the photo which isn’t present in the EXIF data.
Neutral Density (ND) Filters
The EXIF data on the photo shows that the image was shot at ~3:30PM local time. Just going off of the Sunny 16 rule, I would be shooting at f/16 and 1⁄200ths of a second (at ISO 200).
So how did the photographer get his shutter speed all the way up to 30 seconds? Simple. A Neutral Density (ND) filter.
ND filters are pretty simple things, in theory. Just reduce all wavelengths of light by a certain amount.
The image above was, according to the photographer, shot with a B&W ND110 (10-stop) filter.
Fiddling with the Exposure
Now things get a little more interesting. Let’s assume for a moment that the image uses a 5-stop ND filter to achieve it’s exposure. Let’s also assume that we want to keep the aperture at the same setting ( f/22).
| Stops | 10 | 9 | 8 | 7 | 6 | 5 | 4 | 3 | 2 | 1 | 0 | |
| f Aperture | 0.7 | 1 | 1.4 | 2 | 2.8 | 4 | 5.6 | 8 | 11 | 16 | 22 | 32 |
| s Shutter | 1⁄30 | 1⁄15 | 1⁄8 | 1⁄4 | 1⁄2 | 1 | 2 | 4 | 8 | 15 | 30 |
What we’re essentially doing is removing the 5-stop filter from the lens. To maintain the same exposure, we have to shift those 5 stops of light somewhere. Since we want to keep the aperture at f/22, this means that our shutter speed has to become faster to accommodate.
As we can see in our table, moving over 5 stops yields a new shutter speed of 1 second.
So, if keep the aperture (and ISO) the same, and remove the ND filter, then we will now have to reduce the shutter speed to one second to maintain the same exposure.
The new exposure settings are: 1 second @ f/22 (still ISO 200).
Shutter Speed is too Fast!
So we’ve easily managed to compute a new shutter speed to take the same exposed image. The problem is that now we have a (relatively) short shutter speed compared to the original. With such a short shutter speed we will no longer have nearly the same level of blur for moving objects in the scene.
We’re getting to the meat of this post now.
I contend that with the new exposure value of 1 second, that we can achieve the same level of blur by averaging the same number of frames to equal the original exposure value.
That is, the original shutter speed was 30 seconds. Without an ND filter, our new shutter speed to maintain exposure is 1 second.
I’m saying that with 30⁄1 = 30 frames @ 1 second, averaged together, we’ll get the same result as the original image.
Testing the Theory
Things are more fun when we actually start testing out this idea. So I headed out this past weekend and found a nice fountain near my home to see if I could illustrate what I’m thinking.Here is a single frame from one of the shots:

1⁄15 sec at f/11, ISO 200
I had my camera setup on a tripod, and just let the burst mode run with this (9 fps for the win!). So I ended up with 55 images of the scene.
As in my Enfuse tutorial, I first made sure all my images were correctly aligned using Hugin’s align_image_stack:
C:\Program Files\Hugin\bin\align_image_stack -a OUT FILE1 FILE2 FILE3My tripod is a little wobbly, so I wanted to make sure everything was well aligned. Obviously this could be skipped if you’re sporting a fancy, heavy tripod.
After all the images are aligned, I just use Imagemagick the same way I did for averaging my other images:
convert *.tif -evaluate-sequence mean -alpha off OUT.tifSo 55 images × 1⁄15 = 3.6 second equivalent exposure. Here’s the result:

3.6 sec f/11 ISO 200
(mouseover to compare to single frame)
This is the same as if I had used a 5-stop ND filter, and exposed for the same result.
Here is a 100% crop to show some detail better:


Results
I’d say that the results so far are in line with what I expected. That is, multiple shorter exposures average blended together will yield the same visual results as a much longer exposure.Cool! So now I have a way to replicate the results usually obtained with an ND filter, without having to get one.
Now, this way may seem a bit fussy, but really it was pretty simple. Most modern cameras can fire off quite a few shots per second. The setup is no different than shooting with an ND filter (you’ll still have to have a steady tripod setup, and the shot framed up and ready to go).
The only difference is that you are now firing off multiple shots instead of one long shot.
Processing is pretty straightforward once you have all the images, too. Those two commands are all that is needed (and really if my tripod was steady enough, I could have skipped the align_image_stack step).
So the next time you’re out shooting and forget (or don’t have) your ND filter, try setting up the tripod anyway, and firing off a bunch of images instead!
[Bonus] - An added bonus of using this technique is that you’ll be actively reducing the noise in your image through averaging, which is normally the opposite of running your sensor for 30+ seconds in a single go.
Something Neat
I also learned something really neat while writing this. Apparently Imagemagick can also read in video files! So I can also just setup a camera, and take a video of the scene in question. I’ll get about 30 frames per second from my camera, so a 10 second video gets me 300 frames (albeit at HD resolution). In my case, I had 435 frames to quickly average from my video:
435 frames averaged directly from HD video.
Of course, doing it this way means your view has to be really, really still. Otherwise you’ll have to extract all those frames and align them first to keep still objects sharp.
G’MIC/GIMP
Just to be complete, the same results can be obtained through G’MIC in GIMP. G’MIC has a command for doing average blending of all layers in the image:Layers → Blend [average all]
I didn’t do it in GIMP because 55 full resolution images tends to choke things up (and I really didn’t need to see each layer).
Help support the site! Or don’t!
I’m not supporting my (growing) family or anything from this website. Seriously.There is only one reason I am writing these tutorials and posts:
I love doing it.
Technically there is a second reason: to give back to the community. Others before me were instrumental in helping me learn things when I first got started, and I’m hoping to pay it forward here.If you want to visit an ad, or make a donation, or even link/share my content, I would be absolutely grateful (and tickled pink). If you don’t it’s not going to affect me writing and posting here one bit.
I’ll keep writing, and I’ll keep it free.
If you get any use out of this site, I only ask that you do one thing:
pay it forward.

Great Tutorial and now i have learned something new!
ReplyDeleteThanks Pat! I gave this a go last week at Nag's Head, NC. The technique worked, but sadly the composition turned out a bit boring. It was sadly overcast all week.
ReplyDeletehttp://www.flickr.com/photos/humanflight/10423889425/
This is a neat result! :) Thanks for sharing this (I love seeing the stuff people actually go out and do with these posts).
DeleteSomething with this that I've been wondering, (not sure if i'm just not doing it correctly) but how would you get a properly exposed say Sky and Foreground with this technique? I tried the other night at sunset for this but exposing all the shots for the sky had ruined the exposure for the foreground leaving it completely underexposed. That's my only problem that I see sadly :/
ReplyDeleteForeground/sky exposure doesn't fundamentally change between doing it this way or using an ND filter (unless it's a graduated ND filter). So the problem would remain in either method (just the fundamental problem of exposing across a large dynamic range).
DeleteOne option to "fake" a graduated ND filter is to hold your hand or a piece of cardboard over the top half of the lens during a long-ish exposure to reduce the light being captured in that region...
I have used Photoshop extended's Image stacking for a few years to achieve similar results
ReplyDeleteThanks Patrick for this article, and others! I stumbled upon your blog earlier this evening when I was researching something to do with HDR. I'm really glad I did - it's been extremely informative. I don't know if you directly covered this in the article, but 1) (given no restrictions on storage space and processing power) do you think this method is better than using an ND filter?, and 2) Do you think the results are negligibly different from an ND filter?
ReplyDeleteHi Joshua!
Delete1) I do think this method is better, for a couple of reasons. a) you are flexible with the number of frames, meaning if something were to happen to ruin one of the frames, you only lose that frame in this method - with a full long exposure, there's not way to fix it - you'll have to re-do the entire exposure. b) successive images stacked with a mean blending will significantly push noise down overall.
On the other hand, unless the images are shot in close sequence, or over a longer period, there will be gaps in continuous objects during the blend (like light trails from car headlights/taillights for instance).
2) The results _can_ be negligibly different, but the difference is a function of how much is being put in to it.
I also thought of a good reason that this might be better: I have a makeshift ND10 filter made from welder's glass, but it makes all of my shots look extremely green and it's very hard to fix the white balance/color. This method lets you set the white balance during the shot and not have to worry as much in post. And if you do mess up a little, you can correct the white balance for the series of images at once!
DeleteEven better for prints, you don't lose details with this method whereas with a ND filter, you might lose some details (or a lot if you use welder's glass).
Wrt to the light trails, couldn't you take one long exposure then many shorter exposures to compensate for the noise and make a much cleaner image, while preserving the light trails in post?
Sure, it's definitely better than using welding glass, I think (the color shifts can be horrible through it).
DeleteThere is even specialized software for dealing with star trails that do other advanced things, but they can certainly be done with this method easily. (I was going to grab a few frames this past weekend to illustrate, but got too drunk).
I really like your tutorials, I have a question.
ReplyDeleteWhat file format would you use for this method?
I assume if you are shooting with the filter you would be shooting in raw, but will imagemagic handle raw or will it have to be converted to jpgs? if JPGs that it's not really the same then shooting with the filter.
Sorry if I am really off on this, I am too new to the photography and any kind of image processing in general.
It doesn't really matter what you decide to shoot in for these. If you shoot RAW, then do the conversion on the images first to get what you want, then you can stack them in imagemagick. (tiff, png, tga, etc... are all fine for the most part).
DeletePatrick David you say that for format does not matter, but in my experience, shooting RAW tends to fill the buffer of the camera fast. So unless, you set a specific delay (ie use intervalometer) the camera will choke after a few frames.
DeleteCheck the article here, which has examples. I have not tested meet l myself but found it interesting, as I was really disappointed to realise that I could not shoot for long even with moderate slow shutter speeds.
Common knowledge - and used everyday by astronomers to take long exposures of deep space objects.
ReplyDeleteVery nice idea! :) My compliments.
ReplyDeleteAlthough it's not very clear what you use for blending.
I think Enfuse can also blend the pictures?
Why did you use Imagemagick for that?
There is also something else.
You say that 55 images × 1⁄15 is (roughly) 3.6 second equivalent exposure
But I think you also have to deal with the delay between each shot?
Off course it depends on your shutter speed and the object you're photographing, but do you have an idea what the minimum order of shots is needed to get a decent picture?
Because of the discrete character of this method I can image that there would be a kind of optimum.
I was so inspired once I read this to give it a shot, and headed immediately to a local waterfront preserve to get some shots for it. Unfortunately, I am very new to GIMP and am struggling to merge the images....every time I do so, the "result" looks exactly the same as the first image. I'm sure I'm screwing something up with the opacity and merging technique but I would really appreciate some help! (I did look through your GIMP tutorials but didn't find anything on this step specifically.)
ReplyDelete- samanthadmartin@gmail.com
In G'MIC, make sure to set "input layers" to "all visibles" and "output mode" to "new active layer", or else it will only take the top layer
DeleteIt does approximate a long-exposure shot, but depending on the details it can differ quite a bit (for better and for worse of course). With many images, and with each image already long it gets you almost identical results. But with fewer images with short shutter speeds the effect is different (though still interesting).
ReplyDeleteOne of my cameras is an ancient box camera, with fixed shutter speed and fixed aperture. The way to take longer exposures is to prop it up on something and take multiple shots on the same film frame. The shutter speed is ~1/30s so each shot does freeze the scene fairly well. This is the kind of result you get with 16 exposures (if I remember right): https://www.flickr.com/photos/jannem/3405178335/in/photostream/lightbox/
On the other hand, since you have each individual image, you can do fun stuff such as selective masking of all but one frame, and "freeze" just one part of the image: https://www.flickr.com/photos/jannem/3552299541/in/photostream/lightbox/
So, similar but different, and a fun tool in its own right. If you want to recreate long exposure and not get the "stuttering" effect, you may want to combine multiple exposures with a weak ND filter just to drop the shutter speed enough to blur obvious movement.
hi there, its a great idea. one question...i got one nice picture without nd filter. but my problem is, that i notice this way after i shot my picture.
ReplyDeleteso the question is: can i modify my one picture, to fake 5 or more different shots? do u know what i mean? sry, my english is not that good.
Hi Anon! I'd say probably not, unfortunately. If you only have a single exposure to work with, there's not much any of the techniques I've mentioned in this post can do to help... :(
DeleteHi, I tried this a while back, and was very pleased with the end result. Wish I could share a pic for you to see. The end result was a blend of some 25 images, and yes, I think it would be difficult to tell the difference between that and a long exposure shot.
ReplyDelete