
If you’ve been reading this blog for a bit (or just read through any of my previous postprocessing tutorials), then you should be familiar with Wavelet Decompose. I use them all the time for skin retouching as well as other things. I find that being able to think of your images in terms of detail scales opens up a new way of approaching problems (and some interesting solutions).
A short discussion on the GIMP Users G+ community led the member +Marty Keil to suggest a tutorial on using wavelets for other things (particularly sharpening). Since I tend to use wavelet scales often in my processing (including sharpening), I figured I would sit down and enumerate some ways to use them, like:
Wavelets? What?
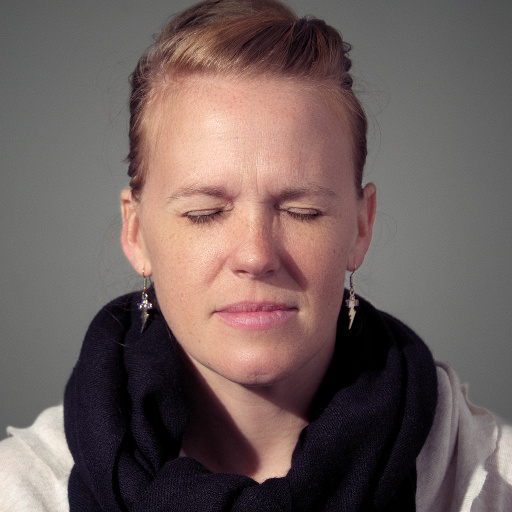
For our purposes (image manipulation), wavelet decomposition allows us to consider the image as multiple levels of detail components, that when combined will yield the full image. That is, we can take an image and separate it out into multiple layers, with each layer representing a discrete level of detail.To illustrate, let’s have a look at my rather fetching model:
It was kindly pointed out to me that the use of the Lena image might perpetuate the problems with the objectification of women. So I swapped out the Lena image with a model that doesn't carry those connotations.
The results of running Wavelet Decompose on the image yields these 6 layers. These are arranged in increasing order of detail magnitude (scales 1-5 + a residual layer).

Notice that each of the scales contains a particular set of details starting with the finest details and becoming larger until you reach the residual scale. The residual scale doesn’t contain any fine details, instead it consists mostly of color and tonal information.
This is very handy if you need to isolate particular features for modifications. Simply find the scale (or two) that contain the feature and modify it there without worrying as much about other details at the same location.
The Wavelet Decompose plug-in actually sets each of these layer modes (except Residual) as “Grain Merge”. This allows each layer to contribute their details to the final result (which will look identical to the original starting layer with no modifications). The “Grain Merge” layer blend mode means that pixels that are 50% value ( RGB(127,127,127) ) will not affect the final result. This also means that if we paint on one of the scale layers with gray, it will effectively erase those details from the final image (keep this in mind for later).
Skin Smoothing (Redux)
I previously talked about using Wavelet Decompose for image retouching:Getting Around in GIMP - Skin Retouching (Wavelet Decompose)
The Open Source Portrait (Postprocessing)
An Open Source Headshot (Ronni) (Postprocessing)
The Open Source Portrait (Postprocessing)
An Open Source Headshot (Ronni) (Postprocessing)
The first link was my original post on how I use wavelets to smooth skin tones. The second and third are examples of applying those principles to portraits. The last two articles are complete walkthroughs of a postprocessing workflow, complete with full-resolution examples to download if you want to try it and follow along.
I guess my point is that I’m re-treading a well worn path here, but I have actually modified part of my workflow so it’s not for naught (sorry, I couldn’t resist).
Getting Started
So let’s have a look at using wavelets for skin retouching again. We’ll use my old friend, Mairi for this.
Mairi
When approaching skin retouching like this, I feel it’s important to pay attention to how light interacts with the skin. The way that light will penetrate the epidermis and illuminate under the surface is important. Couple that with the different types of skin structures, and you get a complex surface to consider.
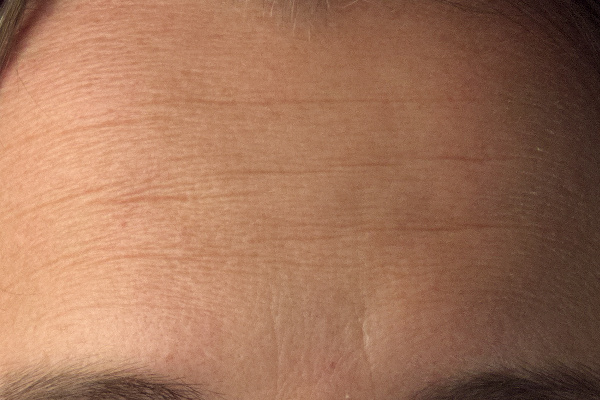
For instance, there are very fine details in skin such as faint wrinkles and pores. These often contribute to the perceived texture of skin overall. There is also the color and toning of the skin under the surface as well. These all contribute to what we will perceive.
Let’s have a look at a 100% crop of her forehead.

If I decompose this image to wavelet scales, I can amplify the details on each level by isolating them over the original. So, turning off all the layers except the original, and the first few wavelet scales will amplify the fine details:

Wavelet scales 1,2,3 over the original image.
You may notice that these fine wavelet scales seem to sharpen up the image. Yes, but we’re not talking about them right now. Stick with me - we’ll look at them a little later.
On the same idea, if I leave the original and the two biggest scales visible, I’ll get a nicely exaggerated view of the sub-surface imperfections:

Wavelet scales 4,5 over the original image.
What we see here are uneven skin tones not caused by surface imperfections, but by deeper tones in the skin. It is this un-evenness that I often try to subdue, and that I think contributes to a more pleasing overall skin tone.
To illustrate, here I have used a bilateral blur on the largest detail scale (Wavelet scale 5) only. Consider the rather marked improvement over the original working on this single detail scale. Notice also that all of the finer details remain to keep skin texture looking real.
Smoothing only the largest detail scale (Wavelet scale 5) results
(mouseover to compare to original)
Smoothing Skin Tones
With those results in mind, I can illustrate how I will generally approach this type of skin retouching on a face. I usually start by considering specific sections of a face. I try to isolate my work along common facial contours to avoid anything strange happening across features (like smile lines or noses).
I also like to work in these regions as shown because the amount of smoothing that may be needed is not always consistently the same. The forehead may require more than the cheeks, and both may require less than the nose for instance. This allows me to tailor the retouching I do for each region separately in order to arrive at a more consistent result across the entire face.
I’ll use the free-select tool to create a selection of my region, usually with the “Feather edges” option turned on with a large-ish radius (around 30-45 pixels usually). This lets my edits blend a little smoother into the untouched portions of the image.
These days I’ve adjusted my workflow to minimize how much I actually retouch. I’ll usually look at the residual layer first to check the color tones across an area. If they are too spotty or blotchy, I’ll use a bilateral blur to even them out. There is no bilateral blur built into GIMP directly, so on the suggestion of David Tschumperlé (G'MIC) I’ve started using G'MIC with:
Filters → G'MIC...
Repair → Smooth [bilateral]
Repair → Smooth [bilateral]
Once I’m happy with the results on the residual layer (or it doesn’t need any work), I’ll look at the largest detail scale (usually Wavelet scale 5). Lately, this has been the scale level that usually produces the greatest impact quickly. I’ll usually use a Spatial variance of 10, and a Value variance of 7 (with 2 iterations) on the bilateral blur filter. Of course, adjust these as necessary to suit your image and taste.
Here is the result of following those steps on the image of Mairi (less than 5 minutes of work):

Bilateral smoothing on Residual and Wavelet scale 5 only
(mouseover to compare to original)
This was only touching the Residual and Wavelet scale 5 with a bilateral blur and nothing else. As you can see this method provides for a very easy way to get to a great base to begin further work on (spot healing as needed, etc.).
Sharpening
I had actually mentioned this in each of my previous workflow tutorials, but it’s worth repeating here. I tend to use the lowest couple of wavelet scales to sharpen my images when I’m done. This is really just a manual version of using the Wavelet Sharpen plugin.The first couple of detail scales will contain the highest frequency details. I’ve found that using them to sharpen an image up works fantastic. Here, for example, is our photo of Mairi from above after retouching, but now I use a copy of Wavelet scales 1 & 2 over the image to sharpen those details:

Wavelet scale 1 & 2 copied over the result to sharpen.
(mouseover to compare)
I’ve purposefully left both of the detail scales on full opacity to demonstrate the effect. I feel this is a far better method for sharpening compared to regular sharpen (I’ve never gotten good results using it) or even to Unsharp Mask (USM). USM can tend to halo around high contrast areas depending on the settings.
I would also adjust the opacity of the scales to adjust how much they would sharpen. If I wanted to avoid sharpening the background for instance, I would also either mask it out or just paint gray on the detail scale to erase the data in that area.
It doesn’t need to stop just a fine detail sharpening, though. The nature of the wavelet decomposition is that you will also get other scale data that can be useful for enhancing contrast on larger details as well. For instance, if I wanted to enhance the local contrast in the sweater of my image, I could use one of the larger scales over the image again and use a layer mask to control the areas that are affected.
To illustrate, here I have also copied scales 3, 4, and 5 over my image. I’ve applied layer masks to the layers to only allow them to affect the sweater. Using these scales allows a nice local contrast to be applied, adding a bit of “pop” to the sweater texture without increasing contrast on the models face or hair.

Using coarser detail scales to add some local contrast to the texture of the sweater
(mouseover to compare to previous)
Normally, if I didn’t have a need to work on wavelet scales, I would just use the Wavelet Sharpen plugin to add a touch of sharpening as needed. If I do find it useful (for whatever reason) to work on detail scales already, then I normally just use the scales directly for manually sharpening the image. Occasionally I’ll create the wavelet scales just to have access to the coarse detail levels to bump local contrast to taste, too.
Once you start thinking in terms of detail scales, it’s hard to not get sucked in to finding all sort of uses for them that can be very, very handy.
Stain Removal
What if the thing we want to adjust is not sub-dermal skin retouching, but rather something more like a stain on a childs clothing? As far as wavelets are concerned, it’s the same thing. So let’s look at something like this:
30% of the food made it in!
So there’s a small stain on the shirt. We can fix this easy, right?!
Let’s zoom 100% into the area we are interested in fixing:

If we run a Wavelet decomposition on this image, we can see that the areas that we are interested in are mostly confined to the coarser scales + residual (mostly scales 4, 5, and residual):

More importantly, the very fine details that give texture to her shirt, like the weave of the cotton and stitching of the letters, are nicely isolated on the finer detail scales. We won’t really have to touch the finer scales to fix the stains - so it’s trivially easy to keep the texture in place.
As a comparison, imagine having to use a clone or heal tool to accomplish this. You would have a very hard time getting the cloth weave to match up correctly, thus creating a visual break that would make the repair more obvious.
I start on the residual scale, and work on getting the broad color information fixed. I like to use a combination of the Clone tool, and the Heal tool to do this. Paying attention to the color areas I want to keep, I’ll use the Clone tool to bring in the correct tone with a soft-edged brush. I’ll then use the Heal tool to blend it a bit better into the surrounding textures.
For example, here is the work I did on the Residual scale to remove the stain color information:


Clone/Heal of the Wavelet Residual layer
(mouseover to compare to original)
Yes, I know it’s not a pretty patch, but just a quick pass to illustrate what the results can look like. Here is what the above changes to the Wavelet residual layer produces:

Composite image with retouching only on the Wavelet Residual layer
(mouseover to compare to original)
Not bad for a couple of minutes work on a single wavelet layer. I follow the same method on the next two wavelet scales 4 & 5. Clone similar areas into place and Heal to blend into the surrounding texture. After a few minutes, I arrive at this result:

Result of retouching Wavelet residual, 4, and 5 layers only
(mouseover to compare to original)
Perfect? No. It’s not. It was less than 5 minutes of work total. I could spend another 5 minutes or so and get a pretty darn good looking result, I think. The point is more about how easy it is once the image is considered with respect to levels of detail. Look where the color is and you’ll notice that the fabric texture remains essentially unchanged.
As a father of a three year old, believe me when I say that this technique has proved invaluable to me the past few years...
Conclusion
I know I talk quite a bit about wavelet decomposition for retouching. There is just a wonderful bunch of tasks that become much easier when considering an image as a sum of discrete detail parts. It’s just another great tool to keep in mind as you work on your images.Help support the site! Or don’t!
I’m not supporting my (growing) family or anything from this website. Seriously.There is only one reason I am writing these tutorials and posts:
I love doing it.
Technically there is a second reason: to give back to the community. Others before me were instrumental in helping me learn things when I first got started, and I’m hoping to pay it forward here.If you want to visit an ad, or make a donation, or even link/share my content, I would be absolutely grateful (and tickled pink). If you don’t it’s not going to affect me writing and posting here one bit.
I’ll keep writing, and I’ll keep it free.
If you get any use out of this site, I only ask that you do one thing:
pay it forward.

Another excellent tutorial on the subject, Pat. I'll be shooting some more seniors in the next few months, so it will definitely get used in my workflow. I don't think I've tried using the first couple of layers for sharpening at the end, though, so I'll look back into your archives to see how that gets done.
ReplyDeleteAwesome technique that makes it very easy to get great results.
ReplyDeleteI try to retouch damaged/old photos in gimp. I have a colour photo that has what looks like a checkered pattern all over it, plus dirt. Will this technique help?
ReplyDeleteIf there's a regular pattern on the image, it might be better to try something like this: https://discuss.pixls.us/t/fourier-transform-for-fixing-regular-pattern-noise/586
DeleteThanks for answering so quickly.
DeleteI see that most of the plugins for Gimp are really old. Wavelet decompose doesn't get updated since 2008 (I'm taking about this one: http://registry.gimp.org/node/11742 I think it's the "official one, right?), and it isn't the oldest. Do you know if it's because they have become "abandonware" but as they still work people keeps using them or they are so perfect there isn't really anything to improve or add? Since I can't believe the second possibility and suspect the right one is the first one I'd want to ask you if there's a more modern repository and I'm just doing wrong using registry.gimp.org (there are plugins not updated almost since the past century).
ReplyDeleteExcuse my ignorance, I'm rather new with Gimp, I used Rawtherapee and Krita during years since Gimp couldn't handle 16 bits; but I recently instaled Gimp 2.9 and since Krita is each day more focused on drawing I wanted to try the standard "de facto", photo editing program for Linux.
Cheers. And thanks for your tutorials, they are very clear yet useful for "students" of Gimp like me.
The actual function for wavelet decompose doesn't really have any improvements to be made - it works just as advertised. :)
DeleteWith that said, it will be increasingly difficult to get a version that will run correctly on 64-bit architectures (the plug-in was for 32-bit iirc).
In that case, I'd personally recommend using G'MIC (http://gmic.eu) instead. It's actively maintained and has a decompose function that does the same thing as wavelet decompose.
Sorry, I think I didn't clicked the correct "Reply" thing and my answer will be misplaced. Feel free to delete it and approve this one instead to keep the comments order sane.
DeleteMany thanks for your almost instant answer, Patrick.
I know G'Mic from Krita (it's installed by default along with Krita) but never used too much. I suppose it's time to do it.
Thank you again. :)
And yes, you are right, on a 64 bits instalation WD seems to work, to decompose the images, but I can't see the high frequency layers alone, they are totally transparent and can only see their effect if I keep the residual layer visible; then I can see what happens if I make invisible one of them, or two, etc, but if I want to edit them without the residual layer visible, I have to do a "blind" edition since I just see the chessboard-like background. So, here we have something that could be improved after 8 long years. :P
Many thanks for your almost instant answer, Patrick.
ReplyDeleteI know G'Mic from Krita (it's installed by default along with Krita) but never used too much. I suppose it's time to do it.
And yes, you are right, on a 64 bits instalation WD seems to work, to decompose the images, but I can't see the high frequency layers alone, they are totally transparent and can only see their effect if I keep the residual layer visible; then I can see what happens if I make invisible one of them, or two, etc, but if I want to edit them without the residual layer visible, I have to do a "blind" edition since I just see the chessboard-like background. So, here we have something that could be improved after 8 long years. :P
Thank you again. :)