

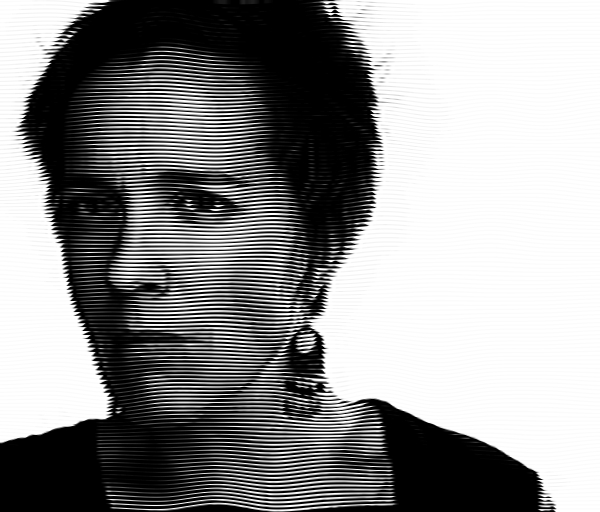
Rolf as a woodcut/hedcut
I was working on the About page over on PIXLS.US the other night. I was including some headshots of myself and one of Rolf Steinort when I got pulled off onto yet another tangent (this happens often to me).
The rest of my GIMP tutorials can be found here:
This time I was thinking of those awesome hand-painted(!) portraits used by the Wall Street Journal by the artist Randy Glass.


Of course, the problem was that I had neither the time or skill to hand paint a portrait in this style.
What I did have was a rudimentary understanding of a general effect that I thought would look neat. So I started playing around. I finally got to something that I thought looked neat (see lede image), but I didn't take very good notes while I was playing.
This meant that I had to go back and re-trace my steps and settings a couple of times before I could describe exactly what it was I did.
So after some trial and error, here is what I did to create the effect you see.
Desaturate
Starting with your base image, desaturate using a method you like. I'm going to use an old favorite of mine, Mairi:

The base image, desaturated.
Duplicate this layer, and on the duplicate run the G'MIC filter, “Graphic Novel” by Photocomix.
Filters → G'MIC
Artistic → Graphic Novel
Artistic → Graphic Novel
Check the box to "Skip this step" for "Apply Local Normalization", and adjust the "Pencil amplitude" to taste (I ended up at about 66). This gives me this result:

After running G'MIC/Graphic Novel
I then adjusted the opacity to taste on the G'MIC layer, reducing it to about 75%. Then create a new layer from visible (Right-click layer, “New from visible”).
Here is what I have so far:

On this new new layer (should be called “Visible” by default), run the GIMP filter:
Filters → Artistic → Engrave
If you don't have the filter, you can find the .scm at the registry here.
The only settings I change are the “Line width”, which I set to about 1/100 of the image height, and make sure the “Line type” is set to “Black on bottom”. Oh, and I set the “Blur radius” to 1.
This leaves me with a top layer looking like this:

After running Engrave
(If you want to see something cool, step back a few feet from your monitor and look at this image - the Engrave plugin is neat).
Now on this layer, I will run the G'MIC deformation filter “random” to give some variety to the lines:
G'MIC → Deformations → Random
I used an amplitude of about 2.35 in my image. We are looking to just add some random waviness to the engrave lines. Adjust to taste.
I ended up with:
Results after applying G'MIC/Random deformation to the engrave layer.
At this point I will apply a layer mask to the layer. I will then copy the starting desaturated layer and paste it into the layer mask.

I added a layer mask to the engraved layer (Right-click the layer, “Add layer mask...” - initialize it to white). I then selected the lowest layer, copied it (Ctrl/Cmd + C), selected the layer mask and pasted (Ctrl/Cmd + V). Once pasted, anchor the selection to apply it to the mask.
This is what it looks like with the layer mask applied:

The engrave layer with the mask applied
At this point I will use a brush and paint over the background with black to mask more of the effect, particularly from the background and edges of her face and hair. Once I'm done, I'm left with this:

After cleaning up the edges of the mask with black
I'll now set the layer blending mode to “Darken Only”, and create a new layer from visible again.
Add a layer mask to the new visible layer (should be the top layer), copy the layer mask from the layer below it (the engrave layer), and paste it into the top layer mask:

Now adjust the levels of the top layer (not the mask!), by selecting it, and opening the levels dialog:
Colors → Levels...
Adjust to taste. In my image I pulled the white point down to about 175.
At this point, my image looks like this:

After adjusting levels to brighten up the face a bit
At this point, create a new layer from visible again.
Now make sure that your background color is white.
On this new layer, I'll run a strange filter that I've never used before:
Filters → Distorts → Erase Every Other Row...
In the dialog, I'll set it to use “Columns”, and “Fill with BG”. Once it's done running, set the layer mode to “Overlay”. This leaves me with this:

After running “Erase Every Other Row...”
At this point, all that's left is to do any touchups you may want to do. I like to paint with white and a low opacity in a similar way to dodging an image. That is, I'll paint white with a soft brush on areas of highlights to accentuate them.
Here is my final result after doing this:

I'd recommend playing with each of the steps to suit your images. On some images, it helps to modify the parameters of the “Graphic Novel” filter to get a good effect. After you've tried it a couple of times through you should get a good feel for how the different steps change the final outcome.
As always, have fun and share your results! :)
Summary
There seems to be many steps, but it's not so bad once you've done it. In a nutshell:- Desaturate the image, and create a duplicate of the layer.
- Run G'MIC/Graphic Novel filter, skip local normalization. Set layer opacity to about 40-60% (experiment).
- Create new layer from visible.
- Run Filters → Artistic → Engrave (not Filters → Distorts → Engrave!).
- Set the Line Height ~ 1/100 of image height, black on bottom
- On the same engrave layer, run G'MIC → Deformation → Random
- Set amplitude to taste
- Change layer mode to “Darken only”
- Add a layer mask, use the original desaturated layer for the mask
- Create new layer from visible
- Add a layer mask, using the original desaturated layer for mask again (or the mask from previous layer)
- Adjust levels of layer to brighten it up a bit
- Create (another) new layer from visible
- Set background color to white
- Run Filters → Distorts → Erase Every Other Row...
- Set to columns, and fill with BG color
- Set layer blend mode to “Overlay”
Help support the site! Or don’t!
I’m not supporting my (growing) family or anything from this website. Seriously.There is only one reason I am writing these tutorials and posts:
I love doing it.
Technically there is a second reason: to give back to the community. Others before me were instrumental in helping me learn things when I first got started, and I’m hoping to pay it forward here.If you want to visit an ad, or make a donation, or even link/share my content, I would be absolutely grateful (and tickled pink). If you don’t it’s not going to affect me writing and posting here one bit.
I’ll keep writing, and I’ll keep it free.
If you get any use out of this site, I only ask that you do one thing:
pay it forward.

I was just refining the techniques seen in http://forksanddrills.blogspot.com/2012/06/reticulas-old-way-in-gimp.html your tutorial and this came at the right time!
ReplyDeleteThe result Woodcut / hedcut (ish) Effect is visually very artistic, and got great results. Both using the steps in this tutorial, as with variations applied experimentally.
I think that I will extend myself a little more with this effect and play with new possibilities.
Thank you for sharing this technique
Thanks for this tut Pat. I have tried it on a small photo but will try at a later date on a large one.
ReplyDeleteAll very welcome, I'm glad it's been useful! :)
ReplyDeleteI'd be careful on using it on too large of an image, as some of those filters will bog down when the imge dimensions get too large... :)
Hi Pat, firstly, thanks for the tips throughout your blog.
ReplyDeleteIt's interesting to note that the 'Engrave' filter can also be replicated somewhat with 'Filters->Distorts->Newsprint', without installing any new filters. Furthermore, you should try using 'Filters->Map->Displace' on the lines to follow the contours of the face, like how another picture can be wrapped on the shape of the body.
Here's my layers, from bottom to top:
1. Background - Original image
2. Copy of #1 - (a) 'Gaussian Blur', and (b) given a higher contrast, to be used for the displacement map. The whites of the image, such as the background in Mairi should be set to middle grey to not give a big displacement effect.
3. Copy of #1 - (a) 'Graphic Novel', as you did. (b) 'Filters->Distorts->Newsprint'. I chose 'Cell size' of 4, set 'Screen' to 'Intensity', 'Angle' to '0.0', 'Spot function' to 'Line' and 'Oversample' to 15 (max). (c) 'Filters->Map->Displace'. I only ticked 'Y displacement' of 5 pixels and used layer #2 as the source for displacement.
4. Almost the same as #3 except 'Angle' I changed to '90.0' for vertical lines, and ticked 'X displacement' instead. The layer blending mode I changed to 'Addition'.
You can then play around with the grey levels of layers #3 and #4 to get the best effect, and merged and overlay with the original image if you want to. Furthermore, you can use different cell sizes on #3 and #4 to get different effects of the verticals and horizontals, or eliminate #4 completely.
The only problem is the displacement filter will distort the edges of the subject. I'm sure you can find a way around this - do tell me though :).