

A Model Idiot.
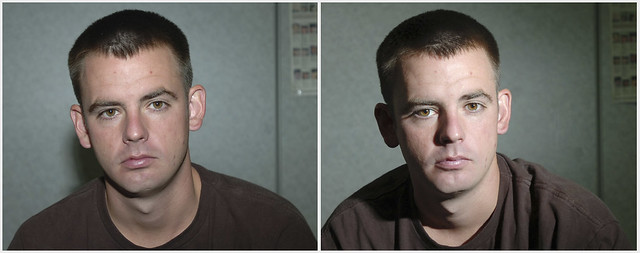
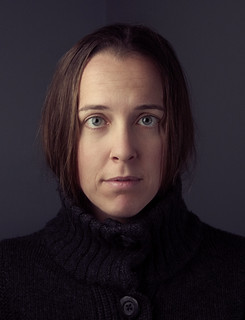
I'm going to walk through the creation of a portrait of my friend Mairi that I did not too long ago. I had been wanting to shoot with Mairi for a while, and only recently got a chance to sit down and actually do it quickly. For reference, here is one of the final results that I'll be walking through the process for:
.")
I say "quickly" because this image was almost spur-of-the-moment, shot in a less than ideal location with about 10 minutes of setup to dial everything in (oh - and was shot while I was keeping an eye on my 2 year old daughter who was running around playing).
The next tutorial in this series is here:
The Open Source Portrait (Postprocessing)
The Open Source Portrait (Postprocessing)
The Idea
Before we even sat down, I already had a rough idea of how I wanted to light this portrait. I knew I wanted a big, diffuse key light set up to be close to a Rembrandt style of lighting, and that I wanted to possibly include a second light for fill to brighten up the shadows just a bit._-_WGA19183.jpg)


_-_Portret_van_Rembrandt_met_een_ringkraag.jpg)
Samples of Rembrandt paintings.
This is actually a common theme for me, as I had built a softbox that I could hold in my left hand, while shooting with my right. Because I had been using wider angle lenses for a long time, it became a sort of habit for me to light in this manner (just look at the majority of the shots in my Off Camera Flash set on Flickr to see what I mean).
If you remember my previous post, Visualize Photography Lighting Setups in Blender, you'll see a rough initial idea based around a softbox at ~60° elevation, and ~60° off axis to camera left (300° frame from below).

The only difference this time was that I knew from experience that a single softbox will leave one side of my subject quite dark, so I wanted to try filling in those shadows with my second flash (they could also have been filled with a reflector as well).
The Equipment
I don't really have much in terms of equipment that is specifically for shooting portraits. This is the gear I use when I'm doing off-camera flash work.
Almost all of my photography gear...
I know it might seem redundant, but for the sake of completeness and to document this as well as I can, I'm going to walk through the list of what I'm using.
The product links below will take you to their respective Amazon page.
Just to be clear, I am using my affiliate code in these links. This means that if you click a link and buy anything on Amazon afterwards, I'll receive a percentage of the sale. This actually doesn't affect anything for you (the price is still the same, etc.) - just that you'll be supporting me if you do.
I just wanted to let you know, so you can make the choice to click (and if you do - thank you!).
Camera
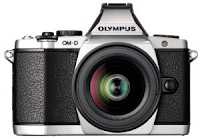
My new toy from this past Christmas is the Olympus OM-D E-M5
The camera is not the important part of the equation here, though. More important is getting a focal length that would produce pleasing compression without flattening things out too much. Here's a good comparison of what different focal lengths will do to the perspective of your subject from photographer Stephen Eastwood:

With my old 17mm pancake lens, I would be looking at distortion like the 2nd row middle, but at the long end of my zoom (50mm), I'm shooting more for 1st row, far right. Traditionally, you'll want to be around 85mm (short-telephoto) or higher for portraits.
Speedlights/Flashes
 I wanted to learn to do off-camera lighting from the basics, and to work my way up from there. If you're interested in doing something similar, I can't recommend David Hobby's blog Strobist enough.
He even has an amazing series of tutorials to walk you through the basics of learning to use flashes called Lighting 101/2. The entire series is well worth the time to read through.
Seriously. Go read it.
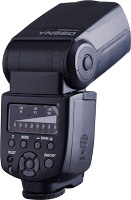
With that being said, I knew I only needed a dependable manual flash to learn with (no need for TTL metering/control for me). In checking around, it appeared that the best price/performance ratio I could find for a manual flash was the Yongnuo YN-560 Speedlight Flash
(This flash may have been replaced with the Yongnuo YN-560 II
One of the nice features of this flash is that it does have an optical slave, meaning that it will fire when it detects another flash firing nearby. This is how I got my fill flash to fire without needing another set of radio triggers.
Speaking of radio triggers...
Wireless Triggers
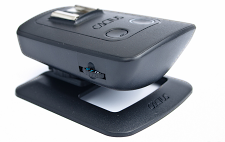 Of course, the speedlights and camera wouldn't work well together without some way for the camera to trigger the flashes. A few years back my friend Sean gave me his old Cactus v4 triggers as a hand-me-down, so I decided to stay with the brand when I picked up some new ones. I went with these, the Cactus V5 Wireless Flash Triggers
You don't have to have a wireless trigger to fire the flash, you could also go the wired route using a PC-sync cord (the YN560 will accept these, you'll just need a hotshoe-sync cord adapter if your camera doesn't already have a PC jack), or if your camera/flash system are integrated (built-in commander mode, etc.).
You could conceivably also use these with the pop-up flash on the camera. Just set the camera flash to the lowest possible setting, and use it to activate the Yongnuo in slave mode.
Lighting Modifier (DIY Softbox)
I'm firmly in the Do-It-Yourself camp when it comes to lighting modifiers (or I'm cheap - read it how you want). The biggest problem is that costs can spiral out of control if you get a nasty case of GAS (Gear Acquisition Syndrome), and I'd rather spend money on things I can't easily build myself. (This list of softboxes on AmazonLuckily, a simple softbox is something I can build myself...
Here's another view of my DIY softbox (with measurements):

This was constructed with foam-core board that can be picked up just about anywhere for pretty cheap. I believe I paid something like $7 USD for each board, and needed 2 to cut all my pieces.
I only had to cut 4 identical trapezoids (24" base x 16" height x 4" top), and then a single 4"x4" square for the end. The whole thing is held together with clear packing tape. I traced my flash head on the square piece and cut out with a simple X-Acto knife.
The fabric on the front was just an old white sheet I had laying around, but any lightweight, white fabric can do. This was also just taped to the front. You could get fancy and tape a tissue inside as a second diffusion panel, but I didn't bother.
Udi over at DIY Photography has a great post detailing how to build 24 different softboxes if you want other inspirations.
The Environment
I envy photographers sometimes when I get a chance to see these wonderful studio spaces they have access to for shoots. Maybe if I was doing this as part of my income, then I could justify the expense required for those spaces, but instead this is purely a hobby. Oh, and check the previous section about me being cheap.With that in mind, this is the space I had available to shoot my portrait:

The only space to shoot in. I like a challenge!
This is actually a very pretty corner to shoot in during the late afternoon. The sun is just behind that corner, and gets diffused nicely in this spot. If the subject is back in the corner, there's a nice ratio of light coming from the windows on either side to produce pleasing light.
You'll notice a microphone stand in the image. That became my impromptu light stand when I taped the softbox to the side of it. I had Mairi sit in the chair, and then adjusted the height/angle of the box before taping it in place.
The small blue bucket on the desk is one of the places I had originally set my bare flash down for fill light.
The First Pass
Initially, I had Mairi backed into the corner, and the lights arranged around her. This didn't work out as I had hoped.The reason was that the spill light from the softbox and bare flash were casting shadows on the walls that I didn't like. The relative exposure of the corner was also pretty bright compared to my subject, which didn't really give much separation at all from the background.
So how to fix this? Well, Strobist has a nice lesson about flash positions and their relative effect on the resulting image (scroll down to the "Light Position: Distance" section). In particular, the ratio between the flash-to-subject distance, and the flash-to-background distance. When they are close, you'll get a background exposed similar to your subject.
Here, have a look at one of the images from that lesson, that shows the light being about the same distance from the subject as the subject from back wall:
Flash to subject ~5 feet, with the wall ~6 feet behind the subject.
Strobist shows this great example below of changing this ratio for a different effect:
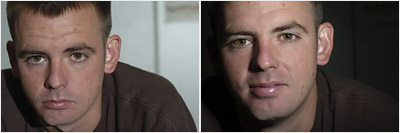
~1:1 ratio on left, ~7:1 ratio on right
On the left, David moved the flash to be ~25 feet from the subject, with the wall about 31 feet from the flash (approximately a 1:1 distance ratio). After adjusting aperture to get the correct exposure for the subject, you'll see how light the rear wall is.
On the right, the flash was pushed in very close to the subject, ~1 foot. While the rear wall was about 7 feet away from the flash. Once the aperture is adjusted to correctly expose the subject you can see how dark the rear wall became. The ratio is now about 7:1.
This is basically the Inverse Square Law for light intensity (don't click the link unless you really, really want to read more about it).
So with that in mind, I corrected my problems by simply moving everything away from the corner. Honestly, this was just trial and error until I started seeing the rear wall being exposed about where I wanted it relative to Mairi.
The Second Pass
With Mairi moved out of the corner, and the flashes still maintaining the same relative distance to her, I was able to drop the exposure of the corner walls down a bit, and I avoided any strange shadows as well. How simple! (You can see my first pass tries in the contact sheet towards the end of this post).Here is approximately what my final setup looked like:

All positions are approximate from my memory, tweak as needed. :)
The keylight is the softbox, which is about 18 inches from the models face (just barely out of frame of the camera).
The keylight is set to about 1/2 power (these flashes are GN58 by the way). Remember, if you can get the diffuse light source closer, it will have a much larger apparent size (if it's far away, it will begin to act like a bare flash again - harsh shadows).
The bare fill flash on the table to the camera right is set to about 1/4 power, and has a zoom head that is set to about 100mm. If you're following along, you'll just need to adjust these power ratios for a proper exposure, but those are my settings if it helps to get you started.
I know this probably reads a bit long, but the truth is that all the steps to get to a final lighting position setup took about 5-10 minutes total. Keep in mind, this was my first time lighting like this in the space, and any future shoots will be even faster (and cleaner once I put away all the kids toys and clutter!).
The Shoot
Once I had the lighting and positioning dialed in, the shoot was a (relative) breeze. I had a couple of things going for me that made it so easy, though. Mairi is a friend of mine, and this was much more like hanging out and joking while I occasionally snapped a photo. She has also modeled in the past, so was absolutely comfortable in front of the camera, and knew how to move and pose for different shots already.What if the model is not already a friend and/or experienced, though?
This section is not intended to be comprehensive, more of my ramblings around my general thoughts at the time. I'm not covering some essentials like model releases and other things.
To be honest, this section (poses/directions/etc.) deserves a writeup of it's own.
To be honest, this section (poses/directions/etc.) deserves a writeup of it's own.
Mood/Music/Atmosphere
I think that the overall atmosphere and mood is vitally important to helping the model do their best (and by extension to get good photos). You want them to feel relaxed and at ease (usually).If you have some way to play music, ask them to bring something they like along. It might also help to let them know what type of shoot you'd like to do, and to plan music appropriately (Vibrant and full of energy? Somber and serious? Easy and lighthearted? Pick music that matches the mood you want to capture).
It's probably also a good idea to cover basic essentials as well, including restroom/changing room for privacy (if needed), as well as refreshments (avoid snacks or have a mirror handy - no need to spend all your time editing food out of teeth - or discoloration).
I'd also spend some time just putting the equipment down and chatting with your subject (if possible). Build a rapport and get to know each other a bit before you even pick up the camera.
Plan
It will help you immensely if you have at least a rough idea of what types of shots you'd like to try to get ahead of time. Communicate this to your subject if possible before the shoot as well. Having examples of poses and other visual aids will be helpful as well (other photos, magazine clippings, etc. for instance).For Mairi, I only actually had two shots in mind up front:
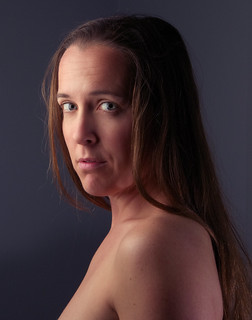
The only two poses I had anything to do with.
Every other shot was her moving through various poses without any direction from me except for the occasional request to direct her gaze somewhere.
Shoot
Don't forget to keep talking with the subject (put yourself in their shoes - just sitting there while you shuffle around clicking away and no feedback kind of sucks). Direct them as needed. And don't forget to come out from behind the lens occasionally.If you want them to do something specifically, try to show them if possible. Don't touch them. (Seriously, don't). If you absolutely have to adjust a hair or piece of clothing, make sure to ask them first.
Finally, a couple of tidbits I picked up from around the web that I thought were neat.
If you want to try and get a natural look, try having the subject look down for a moment and then ask them to bring their head and eyes up to position (asking them to look directly into the lens can capture some wonderful eyes sometimes, especially if you fire off a shot before their head is all the way up into position).
If you want to relax them and possibly catch some nice candid moments, try asking them to do something silly (like faking a cough).
A simple joke can work wonders here too (keep it clean, don't be a creep).
I know that the final images from this session I produced were all more somber, but of all the shots I took, most of them had her laughing and cracking up from some stupid comment/joke I made during the shoot.
So you can get a better feel of how the shoot went, here's a couple of sample contact sheets (chronologically ordered):

Mairi in a dark sweater (notice the first 6 shots are close to the corner).

Mairi in a light grey sweater.
By the time we got to these, I had the lighting dialed in for what I wanted.
You can clearly make out in the first contact sheet my first pass lighting with Mairi much closer to the corner. I didn't like the spill lights on the background, so moved her out of the corner more, which evened out the background, and darkened it a bit for me.
In Summary
Whew! That ran longer than I thought it would. If you've read this far, I applaud you.So, that's basically it for the actual shoot. We worked through a few different poses, I snapped a bunch of photographs, and we had a few laughs. The next part will deal with what comes next - culling all those shots to the keepers, and deciding how to approach post-processing those into portraits I like.
Also, I think I may just go ahead and make a RAW file available in the next session so anyone following along at home has something to work with.
In the next post, I'll be developing my image from my RAW file in Rawtherapee, bringing that image into GIMP for retouching, and finally exporting the end result.
If you want to get a head start on some of the things I'll be talking about in the next post, check out:
Getting Around in GIMP - Skin Retouching (Wavelet Decompose)
Getting Around in GIMP - Skin Retouching (Wavelet Decompose)
I hope this has been at least interesting for you, and remember to check back in a bit for the last part of this Open Source Portrait walkthrough!
The next tutorial in this series is here:
The Open Source Portrait (Postprocessing)
The Open Source Portrait (Postprocessing)

As always, great stuff, Pat. Those Yongnuo's are great lights, especially for the money. I think you can still get the original 560's with the LED's, and for a little cheaper than the 560 II's. I have both and can attest to their usability.
ReplyDeleteThanks! I do love these lights also. The price is just right for anyone wanting to get into off-camera lighting, and I personally haven't had any issues with mine as far as reliability.
DeleteGN58, 1/128th power adjustments, zoom head from 28mm-100mm, manual, slave, and slave2 mode (for pre-flash detection), and audible indicator when she's ready to fire again? :)
Thanks in advance for your articles. I begun to read this one and I will return back sooner.
ReplyDeleteYour job is very useful for all of us.
Thanks, thanks and thanks again.
Francesco
You're very, very and very welcome! ;)
DeleteIn the section where you're taking us through the Strobist flash-distance test shots, did you intend to write:
ReplyDeleteOn the left, David moved the flash to be ~25 feet from the subject, with the wall about 31 feet from the flash (approximately a 1:1 distance ratio).
...or, perhaps, should that read "with the wall about 31 feet from the subject"? (If not, then I'm not understanding how what's described would be considered a 1:1 distance ratio.) Thanks!
Sorry, the wall is about 31' from the flash, and about 25' from the subject.
DeleteDoes that make it clearer? Maybe I should re-write that