

My personal favorite of the set.
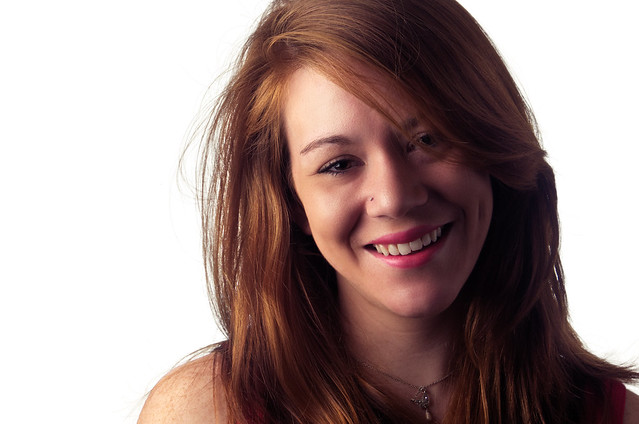
The image we'll be working on in this tutorial.
This post is going to focus on what I had to do to get the final result you see above. I had a couple of small problems that I ran into, but they led to some neat solutions!
My previous Open Source Portrait tutorial is here:
The Open Source Portrait (Equipment & Environment)
The rest of my GIMP tutorials can be found here:
Getting Around in GIMP
The Open Source Portrait (Equipment & Environment)
The rest of my GIMP tutorials can be found here:
Getting Around in GIMP
The Plan
The intention was to shoot her against a white backdrop that I would light and expose to be pure white, and lighting her separately. While I had the rough setup from my previous headshot of myself to work from, I still managed to botch the exposure a little bit (if anyone wants to help me buy a lightmeter so this doesn't happen again, that would just be aces! ;) ).So the result you see above is mostly what I had envisioned before the shoot. If I had things setup correctly, I could have just positioned the model, shot away, and would already have my clean white background ready to go.
Of course, that is not what happened.
File Downloads:
As usual, to keep things open and accessible, here are my “source” files:
Download the .ORF RAW file [Google Drive]
If you'd rather work with my two final JPG outputs (hi/lo), and my crop, here are those files:
2048px Cropped Neutral Exposure
2048px Cropped Exposure Compensated
Download the .ORF RAW file [Google Drive]
If you'd rather work with my two final JPG outputs (hi/lo), and my crop, here are those files:
2048px Cropped Neutral Exposure
2048px Cropped Exposure Compensated
This file is being made available under a Creative Commons Attribution, Non-Commercial, Share Alike license (CC-BY-SA-NC).
You're free to use it, modify it, and share it as long as you attribute me, Pat David, as the originator of the file. You're not allowed to use these images for Commercial purposes.
You're free to use it, modify it, and share it as long as you attribute me, Pat David, as the originator of the file. You're not allowed to use these images for Commercial purposes.
Uh Oh
Really, what I should do is just re-shoot the headshots. The exposures are off, and I would save myself much more time in the end by reshooting. This does present us a nice learning opportunity, however. What would be the steps I could use to still get a good shot out of this? Well, stay with me...So, here is the neutral result that I was seeing in RawTherapee once I was finished:

The problem is that my model is under-exposed, while the edges of the background flash around her are right at the edge of over-exposure. This means that if I increase the exposure to correct for my model, I will begin blowing out the background.
Normally, this would be fine, as I want the background to be pure white anyway. Unfortunately, result of this is that the hairs along the edges that are over the white background will begin to blow out, and I'll lose that detail.
Here is the same image, exposure corrected for my subject (Only change is Exposure Compensation to 1.2 in RawTherapee):

This isn't too bad at first glance. The model is more properly exposed, and the background is now pure white as well, which is what I wanted to begin with.
The problem with the corrected version is the hair. Here's a closeup to illustrate what I mean:


Comparison of edge hairs between neutral exposure (left), and corrected for subject (right).
As you can see, by raising the exposure to proper levels for my subject, I lose too much of the hair details in front of the background. I guess I could let them blow out, but it just doesn't look very well thought out or executed (and the last thing I want is for people to think I poorly executed something, right?).
The New Plan
So now I had a plan of sorts. I want the hair details over a white background from the neutral exposure, but want the subject from the corrected exposure. Now I know I'll be dealing with two images, and compositing them together to give me a single image that has a pure white background, hairs defined against that background, and a properly exposed subject. Piece of cake!Here is a short (30s) video I made to illustrate what I was now going to do:
Because I knew I would be masking my corrected exposure image over the others, there was nothing else to do with it at the moment. That layer is done.
The layer with the hair details is the problem I now had. How can I effectively extract the subject/hair from the background in this image?
Let's look at the image again:
I need a way to effectively mask out the background from the model, and all of her hairs that are over the background. Here are my options:
- I could mask it all by hand (hours of work).
- I can pay someone to do it (according to my latest spam emails this is apparently a thing).
- I can use the Fuzzy Select Tool (magic wand).
- I can use the Foreground Select tool.
Now, if you know me, you'll know that I'm lazy, so the first option is out as long as there are other options on the table. I'm also cheap, so the second option is out as well (seriously, this is a thing?!).
Now, I have tried to use the Fuzzy Select Tool in the past to do this, and let me tell you: it's frustrating. It's hard to get a good selection, and you'll always get things you didn't really want (or vice-versa). Plus, the background is not consistently the same value, shifting with the light falloff on the backdrop. Nope, not for me.
Foreground Select sounds like just the tool for the job, right?
Well, yes, it does sound perfect for this in theory. It's just that in practice it's pretty much useless. See, the current Foreground Select tool uses SIOX to create the mask. Unfortunately, this means that the mask results are binary, meaning that a pixel is either fully transparent, or fully colored. No in-between.

The result of GIMP's Foreground Select tool using SIOX.
It may get a foreground selection for you, but in my case it looks even worse than the blown out, corrected exposure version. So this was a no-go.
IF only there was some more advanced method of pixel extraction from a background that took into account transparency and could magically create a selection for me...
RGGJAN Foreground Select / GIMP Fork
Well, turns out there is! Thanks to Jan Rüegg and Johann Wolf, there is a fork of GIMP that has a much more advanced Alpha Matting foreground select tool, instead of the SIOX implementation in main GIMP.I won't get into the reasons why this is not the default for the Foreground Select tool in GIMP at the moment. It's being worked on somewhat, and may find itself in GIMP at some point. For now you'll have to download a version of GIMP that has it included.
Luckily, +Partha Bagchi has you covered with a pre-compiled version of this fork! Head to Partha.com and get it. (It's the RGGJAN Fork).
I have this same version saved on my machine just for this tool (seriously, that's how useful it is). It's a portable build, so it doesn't interfere with any other GIMP versions I may have installed. Well worth the download.
Using the RGGJAN Foreground Select Tool
So I have my neutral exposure image exported from RawTherapee, and now it's time for some magic (well, maybe not “magic”, but it does seem magical sometimes).For a change I've actually recorded a video of me going through the steps I describe below. I know some people prefer videos, so here it is:
At about 5:30s I start outling the first rough selection, there should be an annotation that will let you fast forward past that part if you'd like (sorry, I was having audio sync issues when I tried to fix it myself before uploading). Otherwise, it's basically a walkthrough of everything I am doing below (the only downside is you have to listen to me ramble - sorry).
Opening up my base neutral exposure image:
You can invoke the command through:
Tools → Selection Tools → Foreground Select
The first thing you'll do is create a rough selection around your foreground object that you want to separate. Due to how the algorithm operates, you'll want to get reasonably close during this step to help speed things up. The more pixels you can identify as definitely foreground/background, the faster things will move (and the better the results).
Here is my rough mask for the image:

After you've identified the rough mask, the tool will now be expecting you to paint over the foreground object that you want to extract. As with the first pass mask, you'll want to make sure you select as much of the foreground as possible, and be sure that it really is the foreground.
If possible it's best to make sure you have good coverage of the foreground object, and to not leave any holes in your selection (paint over the entire foreground object, not just the edges). This will help speed things up a bit.
Once you let go of the mouse button, the algorithm will begin working on identifying the foreground pixels. Go get a cup of coffee.
When I came back from my mandatory coffee break, I had this:

At this point, if you're happy with the results you can just hit “Enter”, and you'll have a new layer with your foreground object over a transparent background.
If you need to tweak the mask further, you can opt to paint-in and identify either backround/foreground pixels to help the algorithm even more. In my case, it pulled a pretty dark clean mask right out of the gate:

On Blue - On Red - On Green - On White (mouseover to change background)
There are a couple of places that I could refine the mask further if needed. There are two spots in the hair on the left, and some background peeking through on the right. Remember, though, that I only really need the hairs that are mostly in front of the background (as I'll be masking most of this with the other exposure image).
So at this point I can say that I'm done! I personally now save the foreground extracted image as a PNG with transparency, and open up my regular GIMP build to finalize the base image.
Compositing it all Together
At this point I'll work entirely in my normal build of GIMP that I use (which also happens to be a Partha build). I'll open up the foreground extracted image, and because I want a white background I'll add a pure white layer underneath it.At this point I'll touch up the slight mask problem in the outlying hair, and make it look a bit cleaner (on the left):

Then I will open up the corrected exposure version over all the other layers. I'll also add a fully transparent layer mask to it:

At this point, I'll simply paint on the mask with white to show through the properly exposed image. I'll use a soft brush, and keep away from getting too close to the edges, instead letting the layer underneath with the extracted foreground handle that for me.
When I'm done, I'm left with this:

If you're curious, here's what my layer palette currently looks like as well:

Almost Ready to Start
So at this point I'm done with just getting my base image ready for my normal workflow. The image is in a state that it should have been in from the start, of course. If I had gotten my exposures correct I could have avoided all of this.We wouldn't have had a chance to learn about a great method of foreground extraction, though!
Normally at this point, I would get started with the next part of my retouching workflow. I am going to stop here, and publish this now, though. I figured it might be more helpful if I record a video of the next steps as well, and I haven't finished those yet.
So stayed tuned later this week, as we start with this base image and try to whip it into shape!

Amazing detail and great information.
ReplyDeleteThanks :)
Great info, but, unfortunately, the RGGJAN fork is not available for Mac, as far as I can tell. Are there any plans to integrate it in the official version?
ReplyDeleteTo be honest, it's a bit of a shame having to use 1 version for foreground extraction (the RGGJAN fork) and another one (from Partha's place) for everything else. :(
Yes, it's already in the official dev version, and will be there when 2.10 lands. I even just recorded a video about using it...
DeleteI actually found that video shortly after I wrote my message. Great! Thanks again!!
ReplyDeletehttp://www.lmmedia.nl/images/Ronni-Corrected-2048.png
ReplyDelete